West Coast is the best coast

Category: Free Inquiry

A summary of what I have learned from my photography inquiry

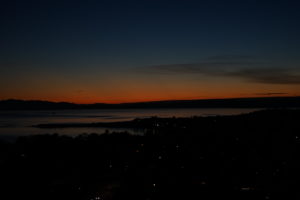
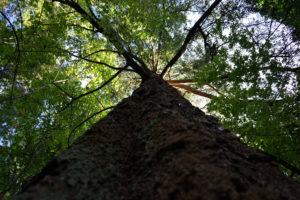
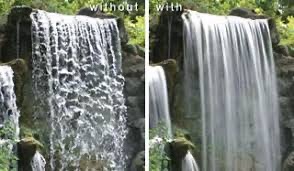
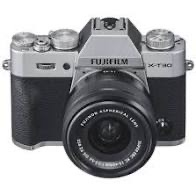
I think I have learned a lot through my inquiry on photography. I started off my inquiry project by buying a camera (this was a very large purchase for me!). I wanted to make the right decision as I knew that I would have this camera for a while. Being able to blog about my decision-making on this purchase and weighing the pros and cons of both the cameras I was considering, I think helped me make a sound decision and so far, I LOVE the Sony Alpha 7 ii. After purchasing the camera, I pretty much had no idea where to start. I didn’t have any previous expense with taking photos with an actual camera since all my photos in the past were done with just an iPhone (not the best quality). So, I decided to start with the basics. I would say I was defiantly more focused and interested in the techniques of shooting photos and not so much on the mechanics of the camera to take a good photo, that’s why I started with looking at the rule of thirds. The rule of thirds is a simple yet effective way to take photos. It is a composition technique that can make the image stronger and more interesting than simply taking a symmetrical photo (“The Rule of Thirds in Photography: A Simple and Effective Composition Technique,” 2018). After, playing with the rule of thirds technique, I was introduced to Lightroom, which is a photo editing software. I was introduced to this software by some family members that are professional photographers, and what a difference it makes! It’s quite easy to use and has more options than just using iPhoto. However, it comes at a price…it’s about $9 a month for the student version, and I haven’t fully decided if it’s worth the cost yet. When I had the free version though I really enjoyed it and when a photo is edited properly more detail can be brought out. I then tried night photography, which now I think I understand more, but when I first tried this in October, it was done trial and error. I didn’t understand how the ISO and shutter speed really played into night photography, probably because I went straight to teaching myself photography techniques and skipped over the mechanical part of photography (Dan, 2020). About mid-way into my inquiry, I got lens filters as a gift. Before this inquiry, I didn’t realize the difference filters make to a photo. I think the polarizing filter is the one I have used the most, as it brings out the colours making my photos more vivid (which I like) (“How are Camera Lens Filters Used in Photography?,” 2018). The neutral density filter I have not used yet but intend to take it to Goldstream next weekend to try it out. Neutral density filters reduce the light that comes into the lens allowing you to get smooth looking water features (“How are Camera Lens Filters Used in Photography?,” 2018). My last couple of techniques I tried were landscape photography and sunset photos, which I love doing. Since being able to reflect on both of these types of photography, I can now see they are in-fact very similar. For both these types of photography, the most important skill I found was that the time of day will make or break your photo. Making sure you are taking photos during the morning or at the golden hour will give you the light that makes photos romanticized and spectacular (something that’s hard to replicate in photo editing software) (Denney, 2019). Also, arriving before-hand, scouting out your angle will help make sure you get a great photo (Eldon & Holtzer, 2020). The last technique that I learned about was taking action shots in low light. This was one was quite tricky, and I still need to practice it, but when trying to learn this skill I learned a lot about ISO and shutter speed.

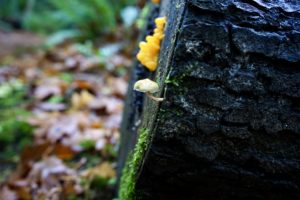
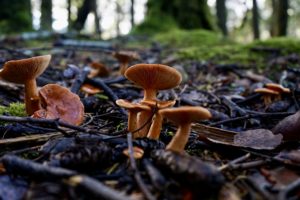
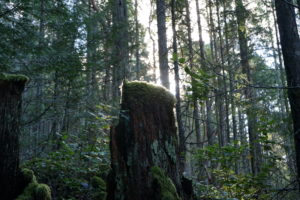
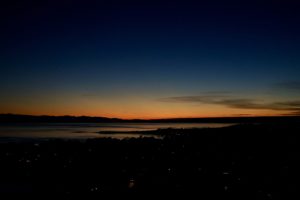
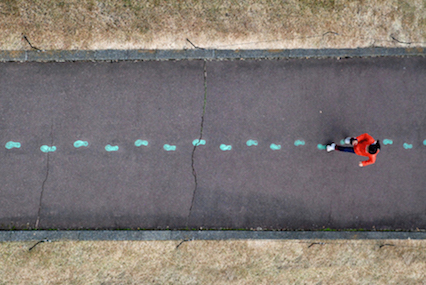
Overall, I think I learned a lot from my inquiry. It got me outside for a walk or hike and I now have some skills in order to take beautiful photos. I plan on keeping up with learning new photography skills past this class, as my passion for photography has increased from this inquiry. At the bottom, I have included my favourite photos that I have taken over this term (and some that I haven’t shown in other blog posts).

References:

Dan. (2020). Everything You Need to Know About Night Photography. Retrieved from https://www.halfhalftravel.com/photography-advice/night-photography.html

Denney, M. (2019). 5 Beginner Landscape Photography Mistakes to Avoid. Retrieved from https://www.youtube.com/watch?v=BWdwkkzFg3M

Eldon, D., & Holtzer, G. (2020). 10 Easy Tips for Capturing Stunning Sunset Photography. Expert Photography. Retrieved from https://expertphotography.com/stunning-sunset-photography/

How are Camera Lens Filters Used in Photography? (2018). O 42 West. Retrieved from https://www.adorama.com/alc/a-beginners-guide-to-camera-lens-filters

The Rule of Thirds in Photography: A Simple and Effective Composition Technique. (2018). PosterJack. Retrieved from https://posterjack.ca/blogs/inspiration/the-rule-of-thirds-in-photography-a-simple-and-effective-composition-technique

Lights! Camera! Action!

This week I learned about taking action shots in low light. If you have ever been to a theatre performance, an indoor sporting event, or in my case, my dog’s playtime, you will know what I mean when I say taking action shots in low light is hard! I found action shots particularly hard to do because they always ended up blurry. So, I did a little research and found some sites that described some techniques and camera settings in order to capture the action shots in low light. The first suggestion was to use manual focus because it gives you complete control (Hamel, n.d.). I found that I am still not comfortable with using the manual focus, so I decided to stick with autofocus for my photos. The article also suggests that if your subject is far away, like at a play or dance recital, to use a long lens that has a large aperture (Hamel, n.d.). The large aperture will let more light in and help with the quality of the photo in the low light setting (Hamel, n.d.). A fast shutter speed is also necessary in order to keep your moving subject in focus (Hamel, n.d.). In order to make sure you are using the right shutter speed you can follow the Reciprocal Rule, which states that the minimum shutter speed needed to keep the picture sharp is the inverse of the focal length (Hamel, n.d.). I found this a little confusing, so I just set my shutter speed by trial and error. Lastly, this article suggests using a high ISO in order to achieve the right exposure (Hamel, n.d.). During my dog’s playtime, I took many shots, and some turned out okay and others not great, but I decided not to worry about that and follow the mantra that “the more photos you take, and the more mistakes that you make, the better your photography will become” (Landwer-Johan, n.d.).


This video goes into more depth on ISO and shutter speed that are needed for low lights action photography.

Some of my photos from this week:


References:

Hamel, J. (n.d.). 13 Tips for Doing Action Photography in Bad Light. Digital Photography School. Retrieved from https://digital-photography-school.com/13-tips-for-doing-action-photography-in-bad-light/

Landwer-Johan, K. (n.d.). Why it’s a Good Idea to Take Lots of Photos. Digital Photography School. Retrieved from https://digital-photography-school.com/good-idea-take-lots-of-photos/

Video from: https://www.youtube.com/watch?v=iMVHloCjot4

A mixture of the day and night

To take sunset photos there are a few tips I found on the internet. The first tip is to experiment; don’t just stay in one spot while taking photos, move around the location (Eldon & Holtzer, 2020). They also suggested arriving early or going before the shoot to determine the best angles to take photos at because sunsets don’t last very long (Eldon & Holtzer, 2020). However, the key to taking high-quality sunset photos is using a low ISO setting. This is because a low ISO setting will get rid of any noise in the photo, which is needed in low light situations (Eldon & Holtzer, 2020). This article also states that when making the ISO low, you should also make the aperture a small value in order to make the photo focused and sharp (Eldon & Holtzer, 2020). Lastly, you need to set the shutter speed. You can either increase your shutter speed to get a sharp photo with no blur or you can lower the shutter speed to show movement in the photo or give it a delicate lighting effect (Eldon & Holtzer, 2020).

My favourite part of these photos was the contrast between the dark blue night sky and the still light orange, yellow sky. I also love how you can barely see the city lights just below the orange sky.

Reference:

Eldon, D., & Holtzer, G. (2020). 10 Easy Tips for Capturing Stunning Sunset Photography. Expert Photography. Retrieved from https://expertphotography.com/stunning-sunset-photography/

Landscape Photography-A lot harder than I thought

This week I experimented with some landscape photography. Before I went out, I watched this video by Mark Denney (2019). In this video, he summarizes five mistakes that people make when taking landscape photographs. The mistake that I found the most relevant to me is taking snapshot photos (Denney, 2019). Mark describes that many beginners (me included) will take snapshot photos that don’t have a clear subject or focus, and usually these photos will have twigs or branches that come into the frame which take away from the photo (Denney, 2019). He suggests asking yourself, why do I want to take this photo? What do I find interesting in this landscape? Another thing that I took out of this video was that it is important to shoot whenever you can, but really focus your efforts on sunset and sunrise (Denney, 2019). The light at both those times is very different than the light half an hour after or before because mid-day sun usually causes flat light (Denney, 2019). With this video in mind I tried to take some landscape photographs, but they did not really turn out. However, practice makes perfect so I will keep trying and experimenting!

Here are a couple of nature photos I took without the use of Mark Denney’s expertise.

Reference:

Denney, M. (2019). 5 Beginner Landscape Photography Mistakes to Avoid. Retrieved from https://www.youtube.com/watch?v=BWdwkkzFg3M

Editing done in seconds- Lens filters

Last week I bought a set of three lens filters: polarizing, neutral density, and a clear protective one. I put the clear protective one on right away. Earlier this week I wanted to try them out, so we went for a walk in Mount Doug. The cool thing with these filters is you can stack them on top of each other. So, for the walk, I had the clear protective filter plus the polarizing filter on top of it. As soon I put the polarizing filter on the greens, reds, and yellows of the natural vegetation was enhanced, making the images more vibrant. Camera filters can improve images by enhancing the contrasts in the image, producing photos with more vivid colours, and eliminating glare and defections from glossy surfaces (“How are Camera Lens Filters Used in Photography?,” 2018). The neutral density (ND) filter I have not experimented with yet. Apparently, this type of lens is supposed to reduce the amount of light that comes into the lens but doesn’t affect the colours of the image (“How are Camera Lens Filters Used in Photography?,” 2018). From this article I found, it says to the ND filter can be used on a sunny day or when trying to take photos in direct sunlight (“How are Camera Lens Filters Used in Photography?,” 2018).  The top photo  demonstrates the difference between a photo without a polarized filter (left) and a photo with a polarizing filter (right). The second photo is similar, but with a neutral density filter (right photo)

By Shutterstock

https://lensmateonline.com/products/hoya-hmc-neutral-density-filter-nd8-49mm?variant=998639775

Reference:

How are Camera Lens Filters Used in Photography? (2018). O 42 West. Retrieved from https://www.adorama.com/alc/a-beginners-guide-to-camera-lens-filters

A little light in the Night Sky

This week for my individual inquiry on photography I took some photos of the moon at night. This was tricky because of the limited amount of night photography I had taken. Before having a camera, I just use my iPhone and iPhone night shots were always blurry and never turned out well. I was pleasantly surprised that the Sony Alpha 7 ii took fairly clear night shots and even without a flash! It can do this because it has a full-framed sensor (one of the reasons I picked this camera over others). The full-framed sensor is twice the size of the APS-C sensor, this means that it can capture twice the amount of light (Dan, 2020). The Sony Alpha 7 ii also has excellent ISO sensitivity which makes the photos cleaner (Dan, 2020). However, if you want a flash, the body of the camera has an area on top for an aftermarket flash that can be bought at any camera store, but for now, I am satisfied with the night photography I can take without it.

Here are some of my night photos:

Reference:

Dan. (2020). Everything You Need to Know About Night Photography. Retrieved from https://www.halfhalftravel.com/photography-advice/night-photography.html

Lightroom

Lightroom is a photography editing software devolved by Adobe. Lightroom has not only excellent editing software but also has lessons and tutorials on photography for cameras and iPhone photos (“LightRoom,” 2020). These lessons range from techniques on how to take better photos, to how to use Lightroom editing software (“LightRoom,” 2020). Before I was told about Lightroom, I had just used the simplistic iPhoto editing that comes with all Apple computers. iPhoto photo editing is great but doesn’t have as many bells and whistles as Lightroom. I found Lightroom quite easy to use. The part I really liked about Lightroom was that as soon as you changed one of the aspects, like the hue or warmth, the image would reflect the change instantly. The only downside so far with the limited dabbling I have done is that Lightroom you have to pay for whereas iPhoto is free. I have added to this blog post a video of a professional photographer demonstrating how to use the different editing tools in Lightroom, as well as a photo of my own that I edited using Lightroom.

The photo to the left was edited in iPhoto, and the photo on the right was edited in Lightroom. As you can see in the second photo, there is more of a contrast between the dog (Tumbo) and the background. His hair and nose or also more defined, making more detail come out in the photo.


Reference:

LightRoom. (2020). Retrieved from https://lightroom.adobe.com

The Rule of Thirds

Playing around with the Sony alpha 7ii is different than just having an iPhone to handle. For example, I went to the park with my dog to take some photos of him running, and at first, I forgot to use the zoom on the lens because I was so used to not using anything when I take photos with my phone. Once I got home and looked at the photos I had taken, I realized that I need some practice and some a lesson on photography techniques. I found a website about photography for beginners and an article that talked about the rule of thirds. The Rule of Thirds deals with the composition of the image you take and makes the image stronger and more interesting (“The Rule of Thirds in Photography: A Simple and Effective Composition Technique,” 2018). The Rule of Thirds is putting your point of interest on intersecting points and lines (“The Rule of Thirds in Photography: A Simple and Effective Composition Technique,” 2018). Some cameras have a feature that puts a tic-tac-toe grid in the viewfinder, whereas some cameras do not, so the photographer can just imagine the grid (“The Rule of Thirds in Photography: A Simple and Effective Composition Technique,” 2018). After reading this I played around with the settings on my camera and found that the Sony alpha 7ii has the grid feature. It’s also important to keep in mind that sometimes symmetry makes a stronger statement then the Rule of Thirds (“The Rule of Thirds in Photography: A Simple and Effective Composition Technique,” 2018). The authors of the article gave the example of baby photos, where you might want to fill the whole frame with the subject (“The Rule of Thirds in Photography: A Simple and Effective Composition Technique,” 2018). They also point out that if you forget the Rule of Thirds, you can also crop an image to give it the same effect (“The Rule of Thirds in Photography: A Simple and Effective Composition Technique,” 2018). Here are some of my photos that applied the rule of thirds too.

The Rule of Thirds in Photography: A Simple and Effective Composition Technique. (2018). PosterJack. Retrieved from https://posterjack.ca/blogs/inspiration/the-rule-of-thirds-in-photography-a-simple-and-effective-composition-technique

Photography

I went on a camping trip to the Juan de Fuca trail with two of my friends at the beginning of the summer, and one had a new mirrorless camera. She was taking pictures throughout our hikes and amazing sunset photos. Since then, I have started my hunt for a quality mirrorless camera that checks off most of my boxes.


My list of wants:

Ă— Durable- I want to be able to take it on hikes, backcountry skiing, camping, and travelling


Ă— Compact- I do not want a DSLR because of the blocky and heaviness of that type of camera


Ă— Quality photos with little editing (Big ask)


Ă— Takes landscape and portrait photos


With some extensive research, I narrowed my search down to two cameras, the Sony Alpha 7II and the Fujifilm xT30. At the start, before I had done my research, I had been told that Fujifilm cameras took photos with great colouring. They also have a retro-looking body, which I like the look of. However, once I had done some actual research and talked to a photographer, I came to the conclusion that the Fujifilm xT30 was not the camera to get. I made this decision based on the recommendation for the photographer, but ultimately because the Fujifilm camera had a cropped sensor. This means that when taking a photo, I wouldn’t see the whole image, it is like having blinders on. So, the area of what could be taken as a  photograph would be narrowed. This allowed me to narrow down my search to the Sony Alpha 7II, which is a full-frame camera. Also, being a full framed camera means that there is a larger contrast between shadows and colours in the image.

https://www.bhphotovideo.com/c/product/1102009-REG/sony_ilce7m2k_b_alpha_a7ii_mirrorless_digital.html

https://www.bestbuy.ca/en-ca/product/fujifilm-x-t30-mirrorless-camera-with-15-45mm-ois-pz-lens-kit-silver/13413204?cmp=knc-s-71700000072655674&gclid=CjwKCAjwh7H7BRBBEiwAPXjadukwDQdguAn0UGE87s–iKpUojefq0bT5EvtGZDKAnqtTvkgEKJgQBoCEv4QAvD_BwE&gclsrc=aw.ds

Key- ×=Checks it off 

– = Does not meet requirements 


Sony alpha 7II

Ă— Durable- the Sony is weather sealed so it will hold up during adventures


–/× Compact- Not as compact as the Fujifilm because of the full frame


Ă— Quality photos- Does take quality photos just not as warm looking as the Fujifilm


Ă— Takes landscapes and portraits


Comparing my “I want list” and what the Sony Alpha 7II offers, it almost completely checks off my list. The Fujifilm although check off some of the boxes, I couldn’t get over the cropped frame. Fujifilm also doesn’t dominate the mirrorless camera market (ie. lens and technology) it may be a risk to buy a Fujifilm camera now, as parts and lens might become expensive or disappear in the future.

© 2024 West Coast Teacher

Theme by Anders NorenUp ↑